Cover Crops
Cover crops are not an afterthought but a very important part of a holistic garden.
We have all observed that any bare soil left for a while will get weeds growing in it. Some might find this frustrating and annoying. However, this is the planet’s way of self-preservation. Bare earth if left alone starts to erode as the wind, sun and rain will totally remove the top soil. Desertification quickly follows. It is estimated that man has destroyed one third of the land surface so far and this process is accelerating.
So in my small scale garden, I’m not going to create a desert am I? Our need for cover crop and mulching is very much to help our personal gardening effort. Here are some compelling reasons: * Enriches the soil big time * Fewer persistent weeds to deal with * Stronger and healthier plants through better soil * Less watering needed * Essential if you do not want to dig * Encourages insects that keep pests down * Attracts pollinators and improves biodiversity

How to Cover Crop
Cover crops also include the idea of green manure but goes further. Also because we embrace no-dig, we eschew the part when green manure is dug in. Choosing the right cover crop is an art as well as experience. It can depend on the time of year and type of soil you have.
With the main crop
First we will explore the idea of using cover crop(s) with the main crop. In this method, the cover crop can be sown with the main crop or even before it. It is safest then to find one that is shallow rooted and easy pinch out to clear a planting spot. If this plant flowers as well, it is a bonus. The flowers will attract pollinators and it can also eventually self-seed in the bed.
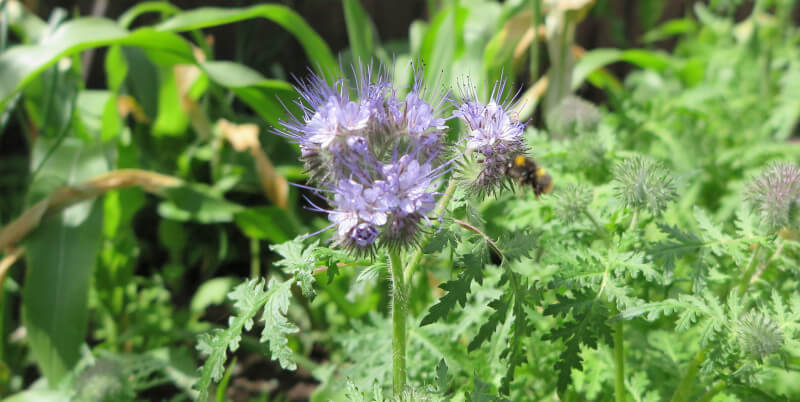
The two species that I have successfully used are the Blue Tansy (Phacelia Tanacetifolia) in the photograph and the red clover (Trifolium pratense). Lamb’s Lettuce (Valerianella locusta) can also be used and the great thing is you can pick it and eat it - it has a lovely subtle flavour. In fact, what you can use as a cover is only limited by your knowledge and imagination!

Some Tansy species can cause skin irritation on contact, so gloves are recommended when working in a bed with it.
After the main crop
By the early autumn (in the UK, H6 to H9) some vegetable crops will have come to the end of their productive period and you can plant different covers to seriously enrich the beds. This planting will be using more vigorous cover crops that can survive through the winter. The choice here can depend on what your aim is for the bed next season.
Crop rotation is worth considering now but including a variety of cover seeds means you do not have to worry. This is the reason to use mixed planting for your main crop in each bed as it reduces or removes the need for crop rotation. Common sense is your great friend here! Also if your beds have been no-dig for more than a season, it will be so vital that you will see fewer problems with non or imperfect rotation. Dug beds need careful choice of follow-on crops as they are more prone to pest and disease issues.
If choosing each cover crop sounds too much work, many seed suppliers will sell you a seed mix for the purpose. My suggestion is to use the mix with the most varied selection. Over the autumn, winter and early spring keep an eye on the covers. Any signs of flower buds mean that they will start to draw on the soil nutrients. Nip the buds off or start the cut-and-lay process.
Cut-and-lay is the most straightforward and it is exactly as it sounds. You just snip the plants at the soil level and lay the cut vegetation on the bed. Then add a layer of compost (50 cm or more) on top. If you still get growth from the previous cover plant, just snip it off just below the soil. Sometimes a few layers of newspaper sheets above the old cut plants but under the new compost will help.
Alternatively if you have the luxury of leaving the bed fallow, allow the covers to grow on. Allow the flowers to form for the pollinators, but nip them off before the seed are produced if you do not want self-seeding to happen.
The key take-away here is always have some plants in the soil. Plants in the soil will feed the microorganisms that in return, hugely enriches the soil.
